What is mail merge and its steps?
Mail merge is a useful tool that will allow you to easily produce multiple letters, labels, envelopes, name tags and more using information stored in a list, database or spreadsheet.
When you are performing a mail merge you will need a word document (you can start with an existing one or create a new one) and a recipient list, which is typically an Excel workbook.
Data Source
Data source consists of the mailing list, for example, name, address, city, pin, telephone number etc. The data is organised in tabular form along with the field names. The data source is associated with the main document, so its field names can be used in the main document and it becomes easy to merge addresses along with the main document.
| NAME | ADDRESS | CITY | PIN | TEL. NO. |
|---|---|---|---|---|
| Divya | #12, Sec 2 | Meerut | 251315 | 58749869 |
| Ronit | #55, Sec 3 | Meerut | 251315 | 25489633 |
| Akshit | #5, Sec 4 | Delhi | 110001 | 20320562 |
| Rohan | #10, Sec 4 | Delhi | 110001 | 23565525 |
Main Document
It contains the text that we wish to send to all the recipients. For example, from the letter, mailing label, envelope or directory.
Merge Field
It is a data item such as NAME, ADDRESS, CITY, PIN etc which instructs MS Word where to insert the data source (names, addresses) information in the main document.
Mail Merge involves three basic steps:
- Creating the main document.
- Specifying a data source.
- Merging the data source with the main document.
Creating a Mail Merge Document
Perform the following steps to create a mail merge document:
Step 1. Open the document that we have to send to different people.
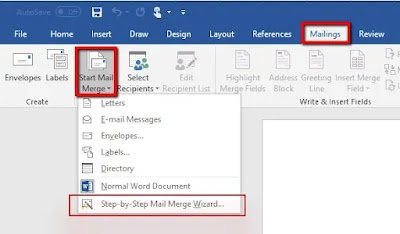
Step 2. Click on the Mailings tab. Click on the Start Mail Merge option in the Start Mail Merge group. A drop-down list appears.
Step 3. Click on the Step-by-Step Mail Merge Wizard option. The Mail Merge task pane appears on the right side of the application window displaying steps 1 to 6 at its bottom.
Step 4. Choose the type of document—letters, email messages, envelopes, labels or directory that we wish to create. Click on the Letters option to create a letter.
Step 5. Click the Next: Starting document under 'step 1 to 6 section at the bottom of the task pane.
Step 6. Choose the type of set-up for your letters. Click the Use the current document radio button. The current document becomes the main document.
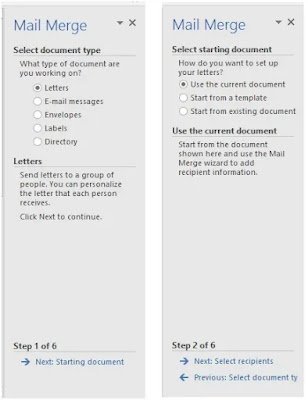
Step 7. Click on Next: Select recipients under the 'step 2 of 6' section. Another task pane appears showing options for defining recipients list.
Creating Recipient List
To create a new mailing list, the following steps should be followed:
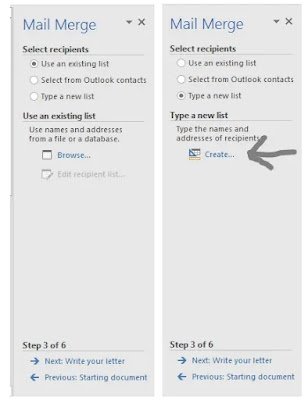
Step 1. To create a new mailing list, select the Type a new list radio button under the select recipients section and click on Create option.
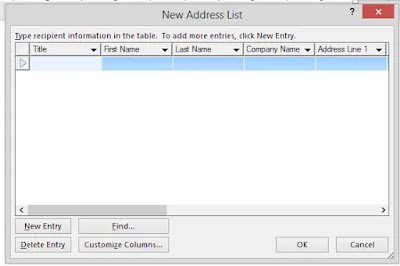
Step 2. The New Address List dialog box will appear on the screen. Click on Customize Columns button to add or remove fields.
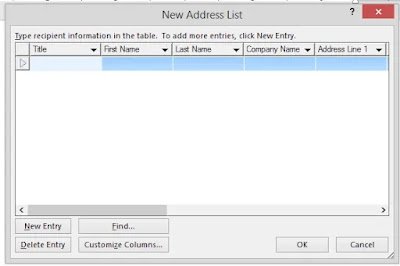
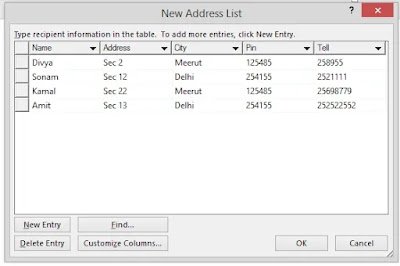
Step 3. Now enter data in the respective fields and click on New Entry button.
Select Recipients
Enter three records of your friends and relatives and click on the OK button.
You will get a Save Address List dialog box.
Specify a name in the File name: text box and click on the Save button.
Now, the Mail Merge Recipients dialog box will appear, in which you will find all the records you have entered.
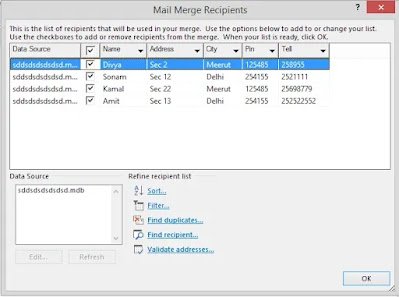
Note that by default, tick marks are placed on the checkboxes on the left side of all the records. It gives an indication that the records are selected.
If you don't want to send the letter to a particular address, just click on that check box to deselect it and click on the OK button.
Now, click on Next: Write your letter (wizard step) under the 'Step 3 of 6' section.
Inserting Merge Fields
To insert Merge (custom) fields, the following steps should be followed:
Step 1. On the Mailings tab, click on the Insert Merge Field button in the Merge & Insert Fields group.
The Insert Merge Field dialog box appears with the fields you have created.
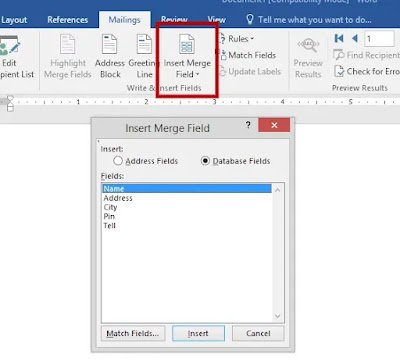
Step 2. Click on the fields that you intend to add.
Step 3. Then, click on the Insert button. Similarly, insert other fields into the document.
Step 4. Click on Close to close this dialog box. The selected Fields appear in your document one after another, horizontally.
Step 5. Separate the Fields by pressing the Enter key.
View the Merged Data
You can check whether MS Word has picked up the data source according to the merged fields or not, by viewing it on the screen.
Step 1. Click on the Preview Results button in the Preview Results group on the Mailings tab, or click on Next: Preview your letter (wizard step) under the 'step 4 of 6' section.

Step 2. The first record will be displayed. Click on the Next Record button ► in the Preview Results group to view the next record of the data source.
Printing Letters
To print your letters, the following steps should be followed:
Step 1. Click on the Finish & Merge button in the Finish group on the Mailings tab.
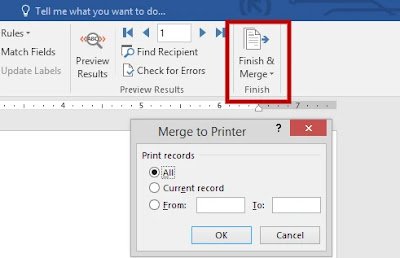
Step 2. Select the Print Documents option from the drop-down grid. The Merge to Printer dialog box appears.
